정렬은 오름차순, 내림차순과 같은 방식으로 특정 필드값인 key를 기준으로 value간의 정렬을 진행해 주며 다음 2가지로 나뉜다.
단순, 비효율적 방법:삽입, 선택, 버블 정렬 ==> 대개 자료의 개수가 적을 때 사용 복잡, 효율적인 방법: 힙, 합병, 퀵 정렬 ==> 반드시 자료의 개수가 많다면 효율적 알고리즘을 사용해야 함.
🧐 간단하지만, 비효율적인 정렬 방법
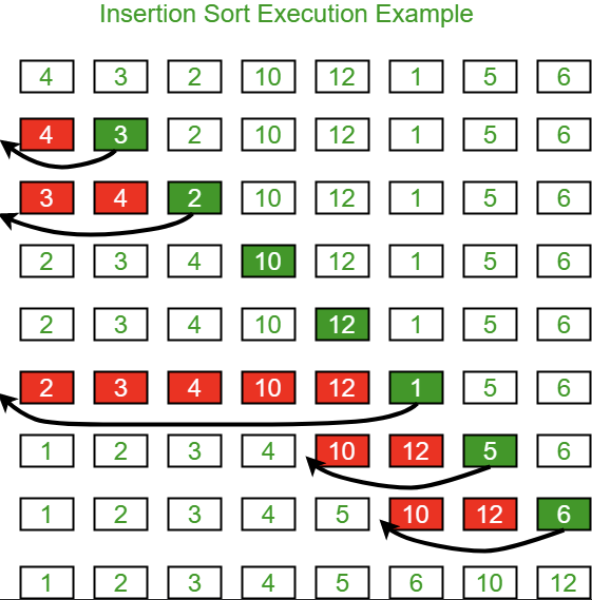
👉 삽입 정렬 (insertion Sort)
삽입정렬은 마치 카드놀이 새 카드를 받는 것 처럼 정렬한 카드들 사이의 올바른 자리에 넣는 것이다.
삽입정렬 방식은 다음과 같이 진행된다.
🤨 insertion sort Algorithm
insertionSort(A, n)
for i <- 1 to n-1 do key <- A[i]; j <- i-1; while j ≥ 0 and A[j] > key do A[j+1] <- A[j]; j <- j-1; A[j+1] <- key
void insertionSort (int A[], int n) {
    for (int i = 0; i < n; i++) {
        int key = A[i];
        int j;
        for (j = i-1; j >= 0 && A[j] > key; j--)
            A[j+1] = A[j];
        A[j+1] = key;
    }
}
👉 선택 정렬 (Selection Sort)
가장 이해하기 쉬운 정렬방법으로 오른쪽 리스트가 공백상태가 될 때까지 오른쪽 리스트에서 왼쪽리스트로 가장 작은 숫자를 선택해 이동시킨다.
이렇게 입력배열 이외에 다른 추가 메모리를 요구하지 않는 정렬방법을 제자리 정렬이라 한다.
🤨 selection sort Algorithm
selectionSort (A, n)
for i <- 0 to n-2 do least <- A[i], A[i+1], . . . , A[n-1] 중 가장 작은 값의 idx; A[i]와 A[least]의 교환; i++;
void selectionSort (int A[], int n) {
    for (int i = 0; i < n-1; i++) {
        int least = i;
        for (int j = i+1; j < n; j++)
            if (A[j] < A[least])
                least = j;
        swap(A[i], A[least]);
    }
}
👉 버블 정렬 (Bubble Sort)
마치 거품이 일어나듯 인접한 2개의 인덱스 값들을 서로 비교하여 큰 값을 오른쪽에 두도록 서로 swapping 하는 것으로 과정은 아래와 같다.
정렬은 오름차순, 내림차순과 같은 방식으로 특정 필드값인 key를 기준으로 value간의 정렬을 진행해 주며 다음 2가지로 나뉜다.
단순, 비효율적 방법:삽입, 선택, 버블 정렬 ==> 대개 자료의 개수가 적을 때 사용 복잡, 효율적인 방법: 힙, 합병, 퀵 정렬 ==> 반드시 자료의 개수가 많다면 효율적 알고리즘을 사용해야 함.
🧐 복잡하지만, 효율적인 정렬 방법
👉 힙 정렬 (Heap Sort)
힙 (heap)은 완전 이진트리(complete binary tree)의 일종으로 우선순위 큐를 위해 만들어진 자료구조다.
힙(heap)은 요소들이 완전히 정렬된 것은 아니지만일종의 반 정렬상태를 유지한다. 이로 인해삽입 삭제의 시간복잡도가 O(log n)으로 다른 방법보다 훨씬 유리하다.
이런 힙은여러 개의 값들 중 최댓값과 최솟값을 빠르게 찾아내기 위해 만들어진 자료구조이다. 이를 위해부모 노드의 key 값 > 자식 노드의 key 값 을 항상 만족하도록 만들어졌다. (보통 최대힙으로 가정하는 편) 단, BST와는 다르게Heap tree는 중복된 값을 허용한다.
- 위는 힙에 대한 설명으로 힙정렬은 다음과 같은 방식으로 진행한다.
1. 정렬할 배열을 먼저 최소 힙으로 변환한다. 2. 가장 작은 원소부터 차례대로 추출한다.
#include <queue>
#include <functional>  //최소 힙을 사용하기에 써줘야 함
using namespace std;

// 최대 힙을 사용한 내림차순 정렬
void heapSortDec(int arr[], int n) {
    priority_queue<int> maxHeap;
    for (int i = 0; i < n; i++) {
        maxHeap.push(arr[i]);
    }
    // maxHeap을 이용해 내림차순으로 정렬
    for (int i = 0; i < n; i++) {
        arr[i] = maxHeap.top();
        maxHeap.pop();
    }
}

// 최소 힙을 사용한 오름차순 정렬
void heapSortInc(int arr[], int n) {
    priority_queue<int, vector<int>, greater<int> > minHeap;
    for (int i = 0; i < n; i++) {
        minHeap.push(arr[i]);
    }
    // minHeap을 이용해 오름차순으로 정렬
    for (int i = 0; i < n; i++) {
        arr[i] = minHeap.top();
        minHeap.pop();
    }
}
👉 합병 정렬 (Merge Sort)
합병정렬은 분할 정복(divide and conquer)기법을 바탕으로 두고 있다.
🤨 Divide and Conquer란?
1. 하나의 리스트를 2개의 균등한 크기로 분할 (점점 작은 sub problem을 만드는 방법) 2. 분할을 계속 지속해서 1개의 원소로 나눈 후 정렬 진행 3. 두 원소씩 다시 합쳐 전체가 정렬된 리스트를 만드는 방법
🤨merge Algorithm
merge(A, left, mid, last) b1 <- left; e1 <- mid; b2 <- mid + 1; e2 <- right; sorted 배열을 생성; index <- 0; while b1 ≤ e1 and b2 ≤ e2 do if (A[b1] < A[b2]) then sorted[idx] <- A[b1]; b1++; idx++; else sorted[idx] <- A[b2]; b2++; idx++; 요소가 남아있는 부분배열을 sorted로 복사; sorted를 A로 복사;
🤨merge sort Algorithm
mergeSort (A, left, right) if left < right mid = (left + right) / 2; mergeSort(A, left, mid); mergeSort(A, mid + 1, right) merge(A, left, mid, right)
#define Max_Size 1024
static void merge(int A[], int left, int mid, int right) {
    int i, j, k = left, l;
    static int sorted[Max_Size];
    for (i = left, j = mid + 1; i <= mid && j <= right; )
        sorted[k++] = (A[i] <= A[j]) ? A[i++] : A[j++];
    if (i > mid)
        for (l = j; l <= right; l++, k++)
            sorted[k] = A[l];
    else
        for (l = i; l <= mid; l++, k++)
            sorted[k] = A[l];
        for (l = left; l <= right; l++)
            A[l] = sorted[l];
}

void mergeSort (int A[], int left, int right) {
    if (left < right) {
        int mid = (left + right) / 2;
        mergeSort(A, left, mid);
        mergeSort(A, mid + 1, right);
        merge(A, left, mid, right);
    }
}
👉 퀵 정렬 (Quick Sort)
평균적으로 매우 빠른 속도를 자랑하는 정렬방법으로 위의 합병정렬같은 분할 정복(divide and conquer)기법을 바탕으로 두고 있다.
다만 합병정렬과는 달리 리스트를 균등하게 분할하지 않고 리스트 안의 한 요소를 pivot으로 선택한다.
퀵정렬의 과정은 아래와 같이 진행된다.
🤨 퀵 정렬 과정
1. 리스트에서 하나의 원소, pivot을 고른다. 2. pivot앞에는 보다 값이 작은 모든 원소들이, pivot 뒤에는 보다 값이 큰 모든 원소들이 오도록 pivot을 기준으로 리스트를 둘로 나눈다(분할). 분할을 마친 후 pivot은 더 이상 움직이지 않는다. 3. 분할된 두 개의 작은 리스트에 대해 재귀(Recursion)적으로 이 과정을 반복한다. 재귀는 리스트의 크기가 0이나 1이 될 때까지 반복된다.
이를 위해 중요한 3개의 함수가 사용된다. - quickSort: 퀵정렬 알고리즘을 이용해 배열의 left ~ right를 오름차순으로 정렬. - partition: 퀵정렬에서 가장 중요한 함수로 pivot을 설정, 데이터를 left, right로 크기에 따라 이동시킴. - swap: 조건에 따라 pivot기준으로 왼쪽과 오른쪽의 값들을 서로 바꿔주기 위한 함수
https://coding-factory.tistory.com/615
#include <iostream>
using namespace std;

static int partition(int A[], int left, int right) {
    int low = left;
    int high = right + 1;
    int pivot = A[low];

    do {
        do {
            low++;
        } while (low <= high && A[low] < pivot);
        do {
            high--;
        } while (high >= left && A[high] > pivot);
        if (low < high)
            swap(A[low], A[high]);
    } while (low < high);
    swap(A[left], A[high]);
    return high;
}

void quickSort (int A[], int left, int right) {
    if (left < right){
        int q = partition(A, left, right);
        quickSort(A, left, q - 1);
        quickSort(A, q + 1, right);
    }
}
우선순위 큐는 다양한 방법(배열, 연결리스트, ...)으로 구현할 수 있지만 가장 효율적인 구조는 힙(Heap)이다.
이런 우선순위 큐는 어떤 요소가 먼저 삭제될 것인지에 따라 다음 2가지로 나뉜다.
최대 우선순위 큐: 우선순위가 가장 높은 것 먼저 삭제 최소 우선순위 큐: 우선순위가 가장 낮은 것 먼저 삭제
※ 힙 (Heap)
힙 (heap)은 완전 이진트리(complete binary tree)의 일종으로 우선순위 큐를 위해 만들어진 자료구조다.
힙(heap)은 요소들이 완전히 정렬된 것은 아니지만 일종의 반 정렬상태를 유지한다. 이로 인해 삽입 삭제의 시간복잡도가 O(log n)으로 다른 방법보다 훨씬 유리하다.
이런 힙은 여러 개의 값들 중 최댓값과 최솟값을 빠르게 찾아내기 위해 만들어진 자료구조이다. 이를 위해 부모 노드의 key 값 > 자식 노드의 key 값 을 항상 만족하도록 만들어졌다. (보통 최대힙으로 가정하는 편) 단, BST와는 다르게 Heap tree는 중복된 값을 허용한다.
- 최대 힙 (max heap)
key(부모) ≥ key(자식)
- 최소 힙 (min heap)
key(부모) ≤key(자식)
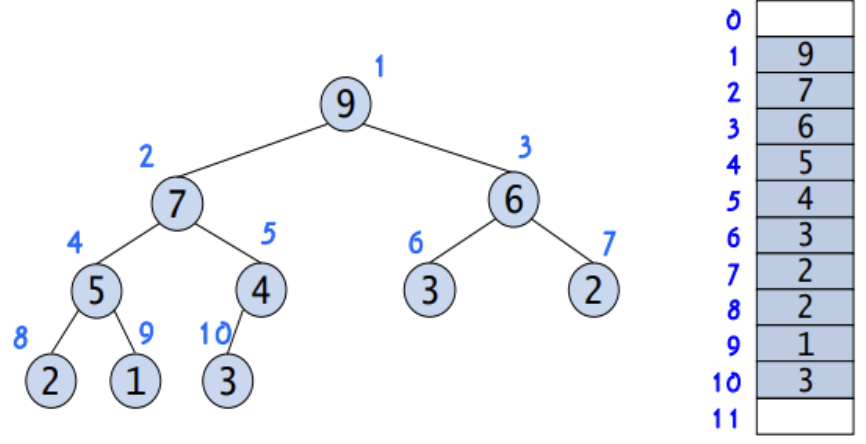
✯ 힙의 기본 틀
왼쪽 자식의 index = 부모 index * 2 오른쪽 자식의 index = 부모 index* 2 + 1
∴ 부모의 index = 자식의 index / 2
※ MaxHeap의삽입연산 (insert)
힙에 새로운 요소가 들어오면 1. 힙의 마지막 노드에 이어서 새 노드를 삽입 2. 삽입 후 새 노드를 부모노드와 교환하여 힙의 성질을 만족시켜준다.
✯ BST의 insert Algorithm
insert (key)

heapSize <- heapSize + 1;
i <- heapSize;
node[i] <- key;
while i != 1 and node[i] > node[PARENT(i)] do
	node[i] ↔ node[PARENT(i)];	// 노드를 서로 교환
    i <- PARENT(i);
※ MaxHeap의삭제연산 (delete)
1. 먼저 root노드 삭제 후, 빈 루트에 힙의 마지막 노드를 가져 온다. (레벨순회 순 마지막 노드) 2. 순차적으로 강등 진행 (자식들 중 더 큰 값과 교환 진행)
✯ BST의 delete Algorithm
remove()

item <- A[1];
A[1] <- A[HeapSize];
i <- 2;

while i ≤ heapSize do
	if i <heapSize nad A[LEFT(i)] > A[RIGHT(i)]
    	then largest <- LEFT(i);
    	else largest <- RIGHT(i);
    if A[PARENT(largest)] > A[largest]
    	then break;
    A[PARENT(largest)] ↔ A[largest];
    i <- LEFT(largest);
return item;
※ MaxHeap 구현
- HeapNode.h
#include <iostream>
#define MAX_ELEMENT 200      // heap array size
using namespace std;

template <typename T>
class Node{
private:
    int key;
    T data;
public:
    Node(){ key = 0; }
    Node(int key, T _data){
        this->key = key;
        this->data = data;
    }
    ~Node(){}

    // getter/setter
    int getKey(){ return key; }
    void setKey(int key){ this->key = key; }
    T getData(){ return data; }
    void setData(T data){ this->data = data; }
};

template <typename T>
class MaxHeap{
private:
    Node<T> node[MAX_ELEMENT];
    int size;   // heap 요소 개수
public:
    MaxHeap(){ size = 0; }
    ~MaxHeap(){}

    // search node
    Node<T>& getParent(int index){
        return node[index/2];
    }
    Node<T>& getLeftChild(int index){
        return node[index*2];
    }
    Node<T>& getRightChild(int index){
        return node[index*2+1];
    }

    // 삽입
    void insert(int key, T data){
        if(isFull()){
            cout << "Heap is Full" << endl;
            return;
        }

        int index = ++size;     // 힙트리 마지막 노드의 다음 위치에서 시작

        // 힙트리를 거슬러 올라가며 부모 노드와 비교
        while(index != 1 && key > getParent(index).getKey()){
            node[index] = getParent(index);
            index /= 2;
        }

        // 최종 위치에 데이터 삽입
        node[index].setKey(key);
        node[index].setData(data);
    }

    // 삭제
    T remove(){
        if(isEmpty()){
            cout << "Heap is Empty" << endl;
            exit(EXIT_FAILURE);
        }

        Node<T> itemNode = node[1];         // root node (삭제 대상)
        Node<T> lastNode = node[size--];    // 힙트리의 마지막 노드
        int index = 1;                      // 마지막 노드의 index (root 부터 시작)

        // root 부터 내려가며 자식 노드와 비교
        while(index <= size){
            if(index*2 > size){             // leaf node인 경우 (자식 노드가 없는 경우)
                break;
            }
            else if(index*2 == size){      // 자식노드가 하나인 경우
                if(lastNode.getKey() < getLeftChild(index).getKey()) {
                    node[index] = getLeftChild(index);
                    index *= 2;
                }
                else
                    break;

            }
            else{                          // 자식노드가 두개인 경우
                int leftChildKey = getLeftChild(index).getKey();
                int rightChildKey = getRightChild(index).getKey();

                // 둘 중 key가 더 큰 자식노드와 교환
                if(lastNode.getKey() < leftChildKey || lastNode.getKey() < rightChildKey){
                    node[index] = leftChildKey > rightChildKey ? getLeftChild(index) : getRightChild(index);
                    index = leftChildKey > rightChildKey ? index*2 : index*2+1;
                }
                else
                    break;

            }
        }
        node[index] = lastNode;     // 마지막 노드를 최종 위치에 저장
        return itemNode.getData();  // 삭제 노드의 data 반환
    }

    // 출력
    void display(){
        int level = 1;
        for(int i=1; i<= size; i++){
            if(i == level){
                cout << endl;
                level *= 2;
            }
            cout << node[i].getData() << "(" << node[i].getKey() << ")  ";
        }
        cout << '\n' << "-------------------------" << endl;
    }

    bool isEmpty(){ return size == 0; }
    bool isFull(){ return size == MAX_ELEMENT - 1; }
};
search (root, key)
if root == null
then return null;
if key = KEY(root)
then return root;
else if key < KEY(root)
then return search(LEFT(root), key);
else return search(RIGHT(root), key);
key값으로 node를 탐색하는 함수로 2가지 방식으로 구현이 가능하다.
- 순환적인 방법
BinaryNode *search(BinaryNode *n, int key){
if (n == NULL) return NULL;
if (key == n->getData()) return n; // key == 현재 node의 data
else if (key < n->getData()) return search(n->getLeft(), key); // key < 현재 node의 data
else return search(n->getRight(), key); // key > 현재 node의 data
}
- 반복적인 방법 (효율성의 측면에서 훨씬 우수)
BinaryNode *search(BinaryNode *n, int key){
while(n != nullptr){
if(key == n->getData())
return n;
else if(key < n->getData())
n = n->getLeft();
else
n = n->getRight();
}
return nullptr;
}
※ BST의 삽입연산 (insert)
BST에서 삽입을 위해 탐색이 선행되어야 한다!
( ∵ BST에서는 같은 key값을 갖는 node가 없어야 하기 때문! )
( ∵ BST에서는탐색에 실패한 위치 = NULL값 = new node를 insert하는 위치 )
✯ BST의 insert Algorithm
insert (root, n)
if KEY(n) == KEY(root)
then return;
else if KEY(n) < KEY(root) then
if LEFT(root) == null
then LEFT(root) <- n;
else insert(LEFT(root), n);
else
if RIGHT(root) == null
앞의 두 연산보다 더욱 중요한 연산으로 BST에서 가장 복잡한 연산이다. 다음 3가지의 경우를 고려해야 하기 때문이다.
case1. 삭제하려는 node가 leaf node인 경우. --> 그냥 삭제하면 되서 가장 간단! case2. 삭제하려는 node가 왼쪽이나 오른쪽 sub tree중 하나만 갖는 경우 --> 해당 sub tree를 부모로! case3. 삭제하려는 node가 양쪽 sub tree 모두 갖는 경우 --> 가장 복잡!
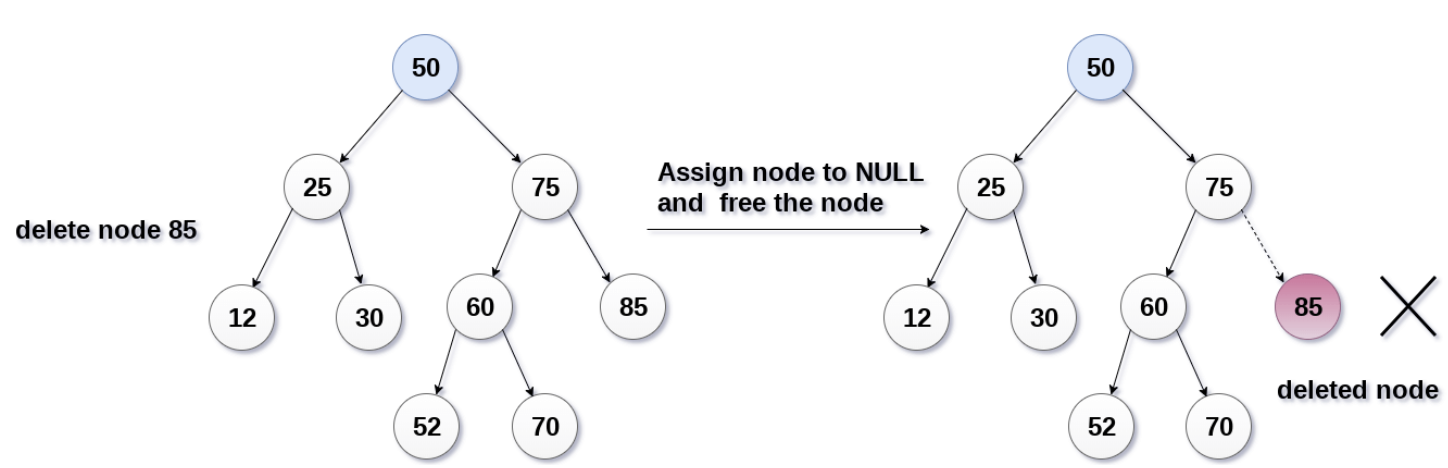
➣ case 1. 삭제 node가 leaf node
i) 부모 노드를 찾아서 ii) 부모 노드의 link 영역을 nullptr로 만든다. iii) leaf node를 최종적으로 동적으로 해제한다. 즉, 부모 노드를 반.드.시! 알아야 한다!
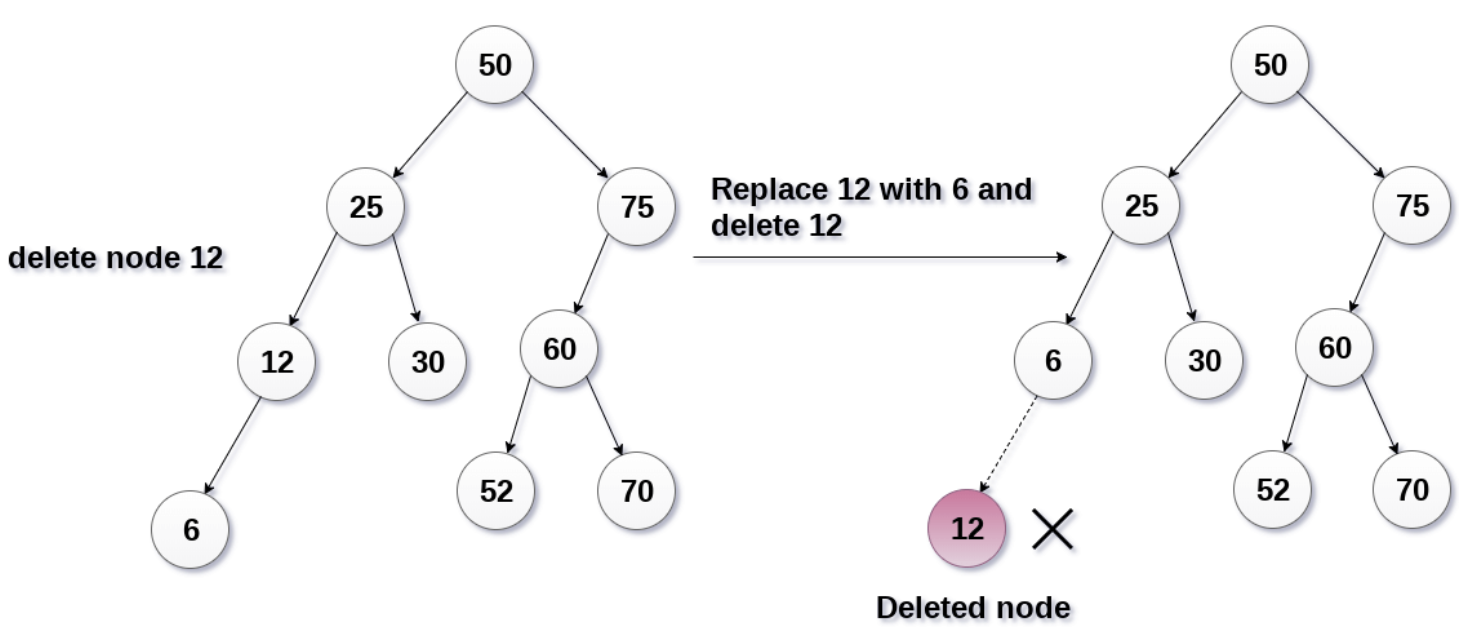
➣ case 2. 삭제 node가 sub tree 하나만 갖고 있음
i) 해당 노드는 삭제하고 ii) 유일한 자식을 부모 노드에 붙여준다. 즉, 부모와 자식노드를 둘 다! 알아야 한다!
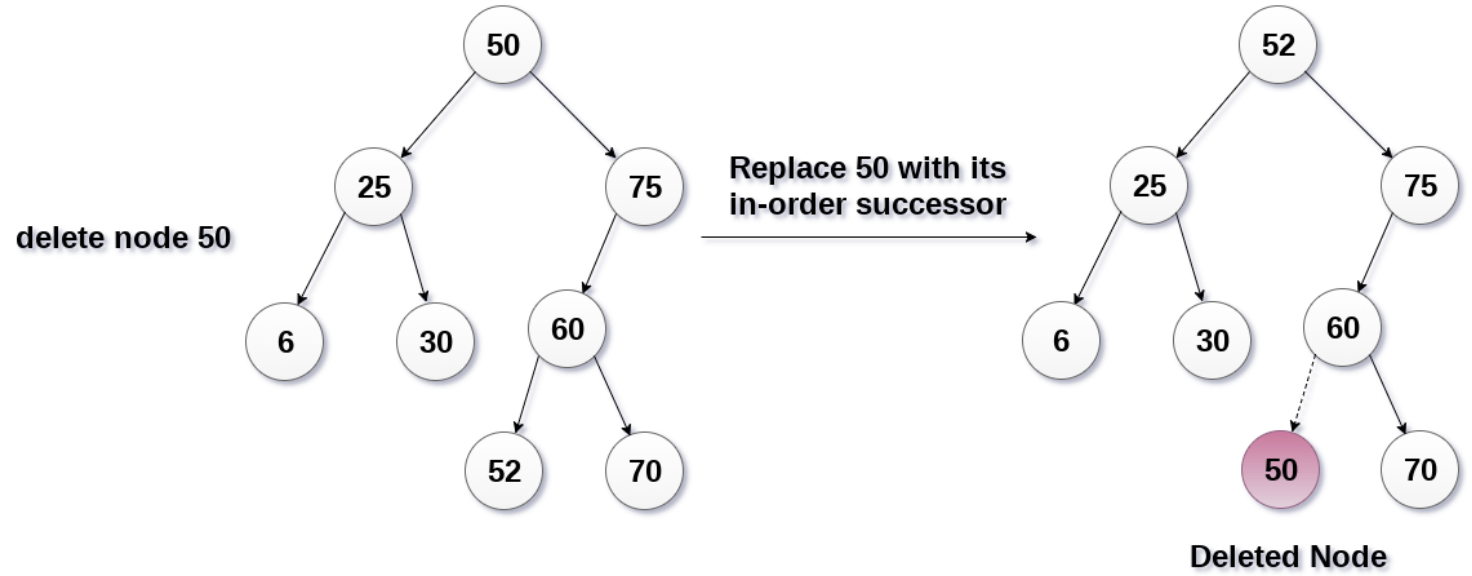
➣ case 3. 삭제 node가 sub tree 모두 갖고 있음
가장 핵심은 "삭제되는 노드와 가장 값이 비슷한 노드"가 핵심! i) left sub tree의 최하단우측 node와 right sub tree의 최하단좌측 node 중 선택 (위 그림에서 30과 50중 선택) (오른쪽 서브트리의 제일 작은 값을 선택했다 가정) 이때, 여러 부모 및 자식 노드의 정보가 필요해서 매우 구현이 복잡해진다.
※ BST 구현
- BinaryNode.h
#include <iostream>

class BinaryNode{
protected:
    int data;
    BinaryNode* left;
    BinaryNode* right;
public:
    BinaryNode(int val = 0, BinaryNode *l = nullptr, BinaryNode *r = nullptr) : data(val), left(l), right(r) { }
    void setData(int val) { data = val; }
    void setLeft(BinaryNode* l) { left = l; }
    void setRight(BinaryNode* r) { right = r; }
    int getData() const { return data; }
    BinaryNode* getLeft() const { return left; }
    BinaryNode* getRight() const { return right; }
    bool isLeaf() const { return left == nullptr && right == nullptr; }
};
트리의 높이를 h라 할 때, 일반적인 선형자료구조의 경우 O(h)가 된다. 이진트리의 경우, 보통 트리의 높이가 log h가 되므로 평균적인 시간복잡도는 O(log n)으로 매우 탁월함을 보여준다.
다만 이런 이진탐색트리의 경우 트리가 간혹 좌우로 불균형해져 트리의 높이가 log n이 만들어 지지 않는 경우가 발생할 수 있다. 이를 보완하는 방법으로 트리의 높이를 항상 log n으로 한정시키는 AVL 트리가 있다. Adelson Velskii Landis tree는 이진탐색트리의 노드의 불균형 문제를 해결한 트리로 밑에서 설명하겠다.
※ AVL 트리 (AdelsonVelskiiLandis Tree)
AVL 트리는 왼쪽과 오른쪽 sub tree간의 높이차가 1 이하인 BST이다. 이를 통해 O(log n)의 시간을 항상 보장한다!
탐색연산은 BST와 동일하지만 삽입, 삭제의 경우가 균형이 깨지기에 AVL 트리는 삽입과 삭제에 추가적 연산을 진행한다.
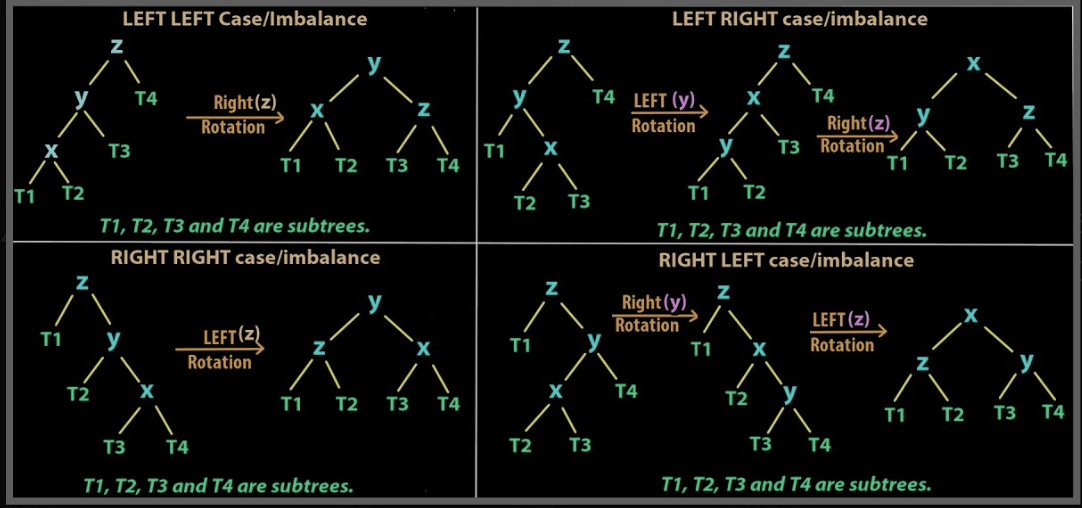
이런 균형이 깨진 트리를 다시 균형있게 만드는 방법으로 다음 4가지 방법이 있다.
새로 삽입된 노드 N과 N에서 가장 가까운 조상 노드 A에 대해 ‣ LL 타입: N이 A의 왼쪽 sub tree의 왼쪽 sub tree로 삽입 ‣ LR 타입: N이 A의 왼쪽 sub tree의 오른쪽 sub tree로 삽입 ‣ RR 타입:N이 A의 오른쪽 sub tree의 오른쪽 sub tree로 삽입 ‣ RL 타입:N이 A의 오른쪽 sub tree의 왼쪽 sub tree로 삽입
‣ LL 회전: 오른쪽으로 회전 ‣ LR 회전: 왼쪽-오른쪽으로 회전 ‣ RR회전: 왼쪽으로 회전 ‣ RL 회전: 오른쪽-왼쪽으로 회전
✯ AVL Tree의 Rotate Algorithm
☞ 단순 회전 알고리즘(LL, RR)
rotate_LL(A)
B <- A의 왼쪽 자식
B의 오른쪽 자식을 A의 왼쪽 자식으로 만든다.
A를 B의 오른쪽 자식 노드로 만든다.
rotate_RR(A)
B <- A의 오른쪽 자식
B의 왼쪽 자식을 A의 오른쪽 자식으로 만든다.
A를 B의 왼쪽 자식 노드로 만든다.
☞ 이중 회전 알고리즘 (RL, LR)
rotate_RL(A)
B <- A의 오른쪽 자식
rotate_LL(B)가 반환하는 노드를 A의 오른쪽 자식으로 만든다.
rotate_LR(A)
B <- A의 왼쪽 자식
rotate_RR(B)가 반환하는 노드를 A의 왼쪽 자식으로 만든다.
rotate_LL(A)
이와 달리 선형이 아닌 "계층적 구조 (hierarchical)"를 표현하기 위해 사용되는 자료구조인 트리(tree)에 대해 알아보고자 한다.
컴퓨터 저장장치의 디렉토리 구조도 계층적인 자료구조로 많은 상황에서 사용되기에 자료구조를 배우는 이유중 하나라 할 수 있다.
자료구조의 양대산맥이라 생각될 정도로 그래프만큼 많이 사용되며 자주 사용되는 자료구조이기에 잘 익혀두자!
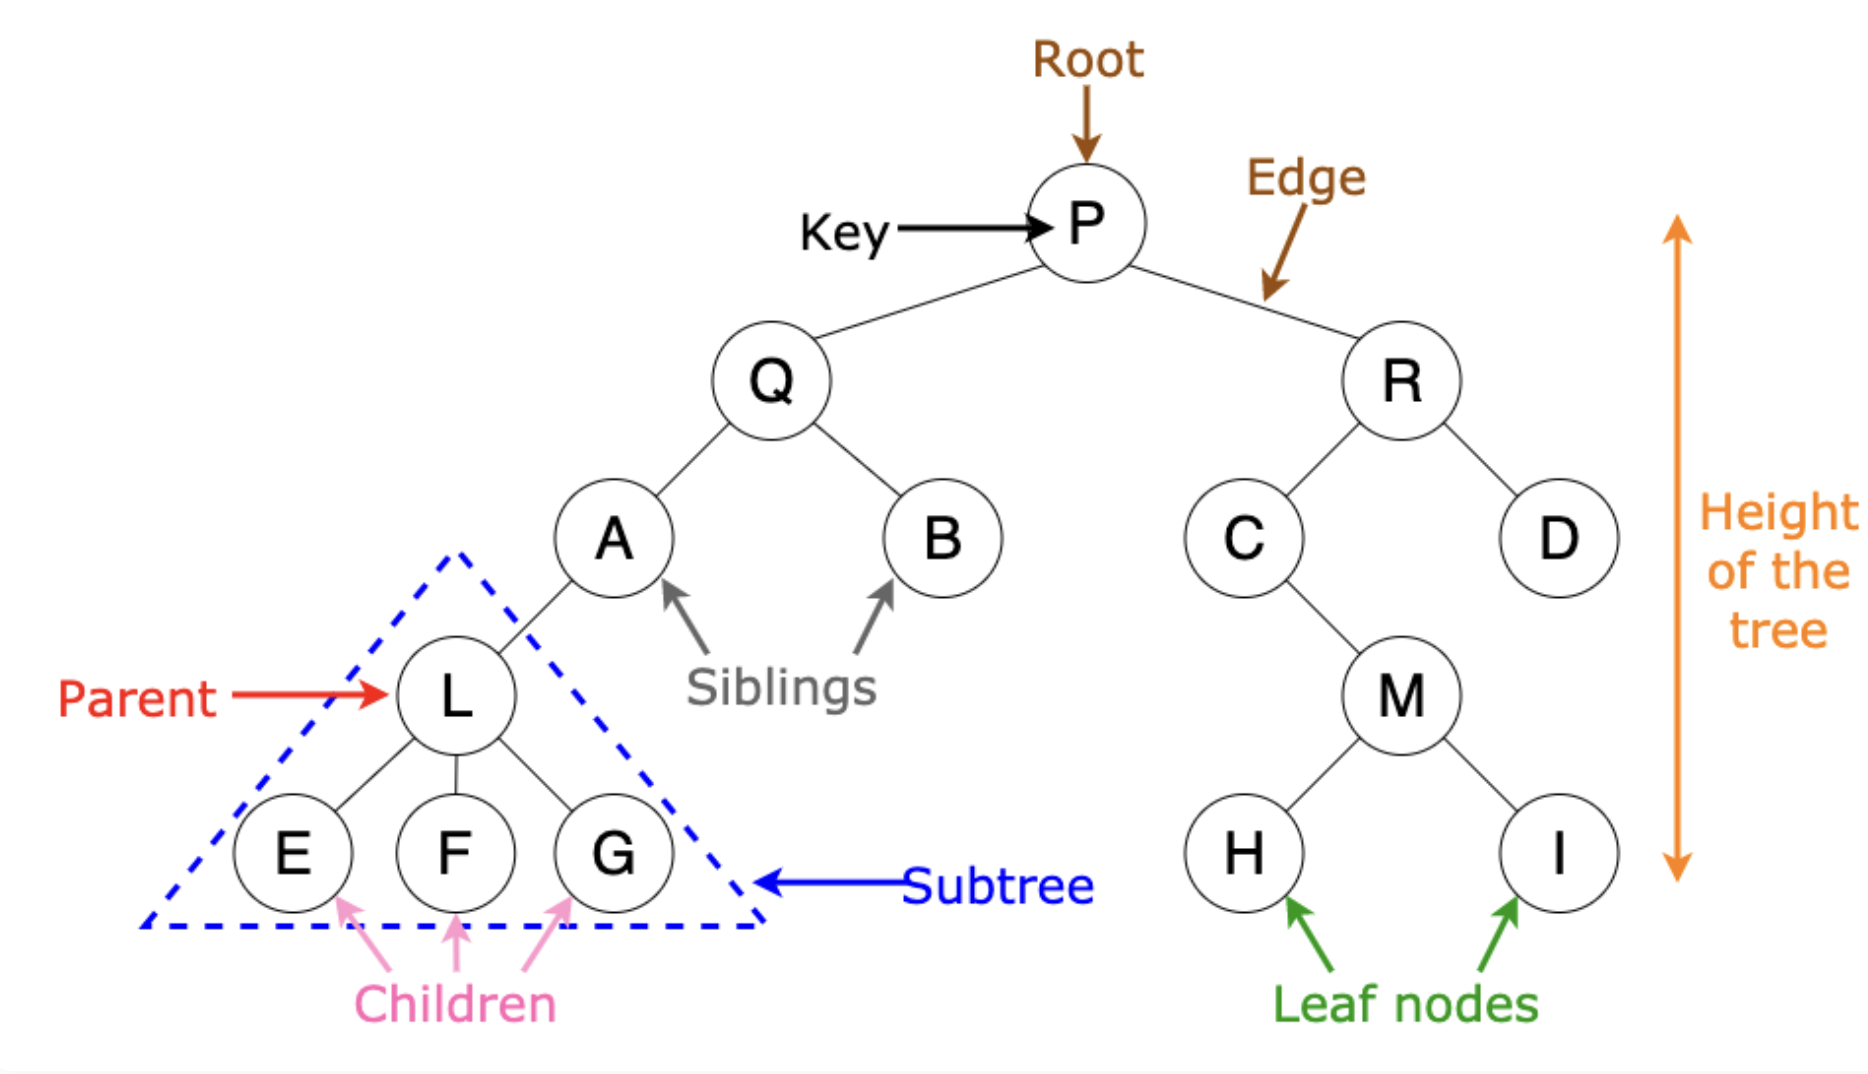
※ 트리 용어
트리의 구성요소로는 루트(root), 서브트리(subtree), 간선(edge), 노드(node) 등이 있다.
- 차수(degree): 어떤 node가 갖는 자식노드의 개수
- 레벨(level): 트리의 층 수로 root를 level 0이나 1로 매긴다.(책마다 조금씩 다름)
- 높이(height): 트리의 각 층에 번호를 매기는 것으로 트리의 높이는 최대 레벨을 통해 결정할 수 있다.
※ 이진트리 (Binary Tree)
모든 노드의 차수가 2 이하이며 왼쪽 서브트리와 오른쪽 서브트리가 반드시 구별되어야 한다.
n개의 노드는 n-1개의 간선(edge)를 가지며 높이가 h인 이진트리의 최대 노드 개수는 2^h - 1이다. n개의 노드를 갖는 이진트리의 높이는 다음과 같다. ⎡log(n+1)⎤ ≤ h ≤ n
포화이진트리(full binary tree): 모든 레벨의 노드가 꽉 차있는 트리, 높이가 h라면 총 2^h-1개의 노드를 갖는다. 완전이진트리(complete binary tree): 레벨 1~h-1까지는 모두 노드가 채워져 있고 마지막 레벨 h는 왼쪽~>오른쪽으로 순서대로 채워진 트리이다. (즉, 마지막 레벨의 노드가 꽉 차있지 않아도 됨)
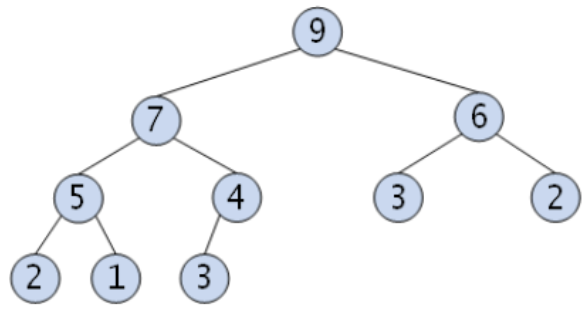
대표적인 완전이진트리 예로는 힙(heap)이 있다.
※ 이진트리 순회 알고리즘
✯ 전위 순회 (preorder)
preorder(x)
if x != null
then print data(x); // 루트(x)노드 처리
preorder(LEFT(x)); // 왼쪽 subtree 방문
preorder(RIGHT(x)); // 오른쪽 subtree 방문
✯ 중위 순회 (inorder)
inorder(x)
if x != null
then inorder(LEFT(x)); // 왼쪽 subtree 방문
print data(x); // 루트(x)노드 처리
inorder(RIGHT(x)); // 오른쪽 subtree 방문
✯ 후위 순회 (postorder)
postorder(x)
if x != null
then postorder(LEFT(x)); // 왼쪽 subtree 방문
postorder(RIGHT(x)); // 오른쪽 subtree 방문
print data(x); // 루트(x)노드 처리
※ 이진트리 노드 개수 및 높이 구하는 알고리즘
✯ node 개수 구하기
getCount(x)
if x == null
then return 0;
else return 1 + getCount(LEFT(x)) + getCount(RIGHT(x));
✯ leaf node 개수 구하기
getLeafCount(x)
if x == null
then return 0;
if LEFT(x) == null and RIGHT(x) == null
then return 1;
else return getLeafCount(LEFT(x)) + getLeafCount(RIGHT(x));
✯ height 구하기
getHeight(x)
if x == null
then return 0;
else return 1 + max(getHeight(LEFT(x)), getHeight(RIGHT(x)));
※ 이진트리 구현
✯ BinaryNode.h
#include <iostream>

class BinaryNode{
protected:
    int data;
    BinaryNode* left;
    BinaryNode* right;
public:
    BinaryNode(int val = 0, BinaryNode *l = nullptr, BinaryNode *r = nullptr) : data(val), left(l), right(r) { }
    void setData(int val) { data = val; }
    void setLeft(BinaryNode* l) { left = l; }
    void setRight(BinaryNode* r) { right = r; }
    int getData() const { return data; }
    BinaryNode* getLeft() const { return left; }
    BinaryNode* getRight() const { return right; }
    bool isLeaf() const { return left == nullptr && right == nullptr; }
};
- 스택,큐: 전단(front), 후단(rear)에 접근방식이 제한되어 새로운 객체 삽입 삭제 시 중간에 하는 것을 허용X
- 리스트: 위와 달리 임의의 위치에 있는 항목에 대한 연산이 되기에 선형 자료구조들 중 가장 활용이 자유롭다.
cf-2) 연결리스트와 리스트의 용어의 차이는 무엇일까?
- 리스트: 특정 자료구조를 말하는 것으로 대응되는 키워드는 스택, 큐 등이다
- 연결리스트: 그런 자료구조를 구현하는 프로그래밍 기법으로 대응되는 키워드는 배열과 같은 뉘앙스이다.
※ 선형 리스트 (Linear List)
리스트(list) 또는 선형 리스트(linear list)라 불리는 자료구조는 항목들이 순서나 위치를 갖는 것이다.
- array, stack, queue, deque, list . . .
이때, 리스트와 집합이 다르다는 것을 알아야 한다.
- list(리스트): 각 항목간의 리스트에 들어있는 항목들 사이 순서가 존재한다.
- set(집합): 각 항목간의 순서의 개념이 없다.
또한 리스트는 자유로운 데이터 접근 방식으로 다양한 연산이 가능하다.
insert(pos, item)   // 리스트의 pos위치의 새 요소, item 삽입
delete(pos)         // 리스트의 pos위치의 요소 삭제
getEntry(pos)       // 리스트의 pos위치의 요소 반환
find(item)          // 리스트에 item이 있는지 검사
replace(pos, item)  // 리스트의 pos위치에 있는 요소를 item으로 바꿈

isEmpty()           // 리스트가 비어있는지 검사
isFull()            // 리스트가 가득 차있는지 검사
size()              // 리스트 안의 요소개수를 반환
display()           // 리스트 안의 모든 요소 출력
리스트를 구현하는 방식은 배열을 사용하는 방법과 연결리스트 방식으로 나눌 수 있는데 보통 연결리스트를 사용한다.
배열 구현의 장점: ADT를 가장 간단하게 구현할 수 있다.
배열 구현의 단점: 요소의 개수에 제한이 생기며 메모리 낭비 및 비효율성과 삽입 삭제시 많은 요소의 이동 등이 있다.
연결리스트의 장점: 필요 시에만 노드를 동적으로 생성해 연결하며 연속된 메모리 공간을 할당할 필요도 없다.
연결리스트의 단점: 배열에 비해 구현이 복잡하다.(= 프로그래밍이 어려워지고 오류발생가능성이 커짐)
또한 할당과 해제가 빈번하게 일어나 프로그램이 느려질 수 있다는 단점도 존재한다.
따라서 보통 포인터를 사용한 연결리스트(Linked List)로 구현하는데, 이 방법도 다음 3가지 방법으로 나눌 수 있다.
단일 연결리스트 / 원형 연결리스트 / 이중 연결리스트
이때, NULL의 설정을 통해 마지막 노드를 표현한다.
※ 연결 리스트 구현
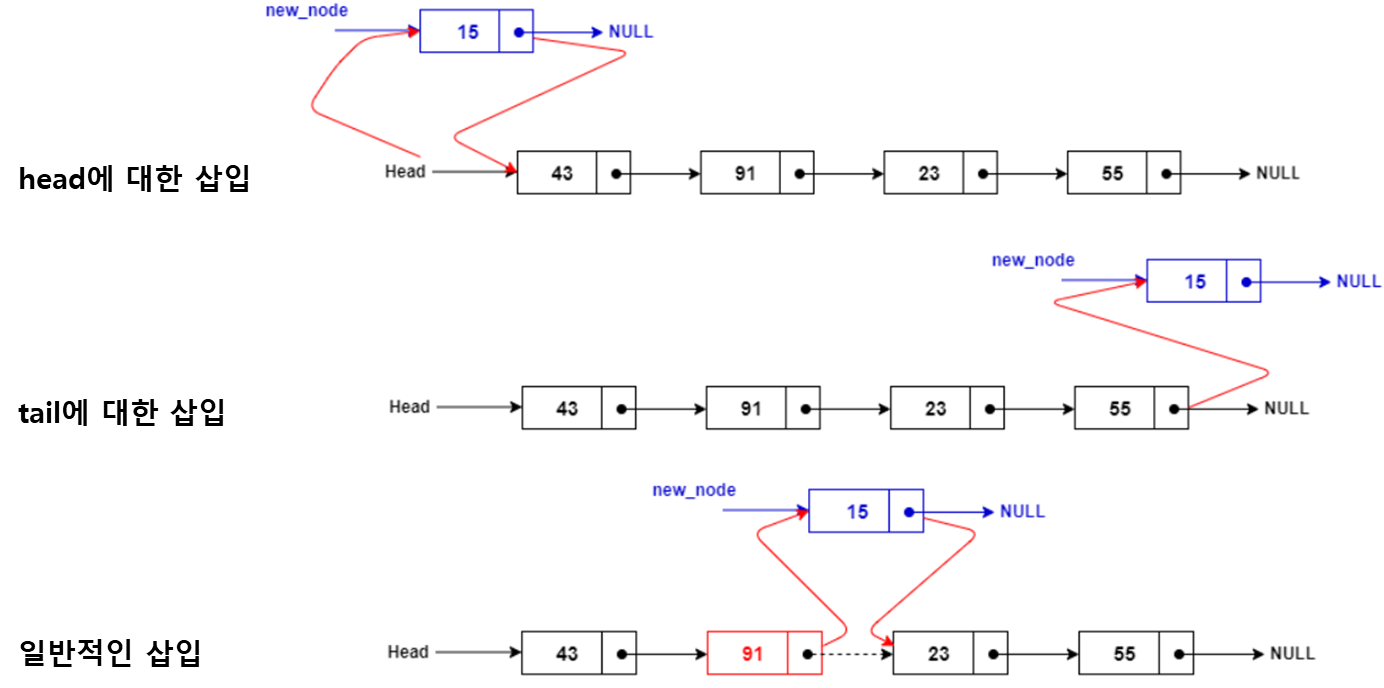
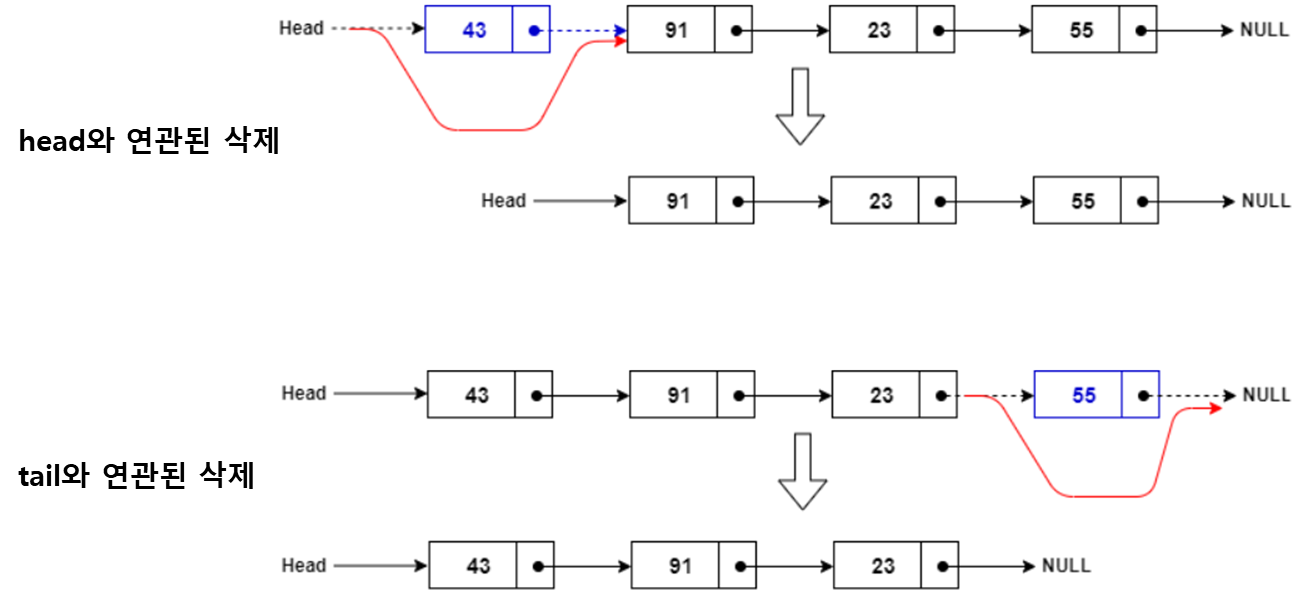
§ 단일 연결리스트 (Single Linked List)
- 삽입과정 (insertion)
- 삭제과정 (deletion)
[구현]
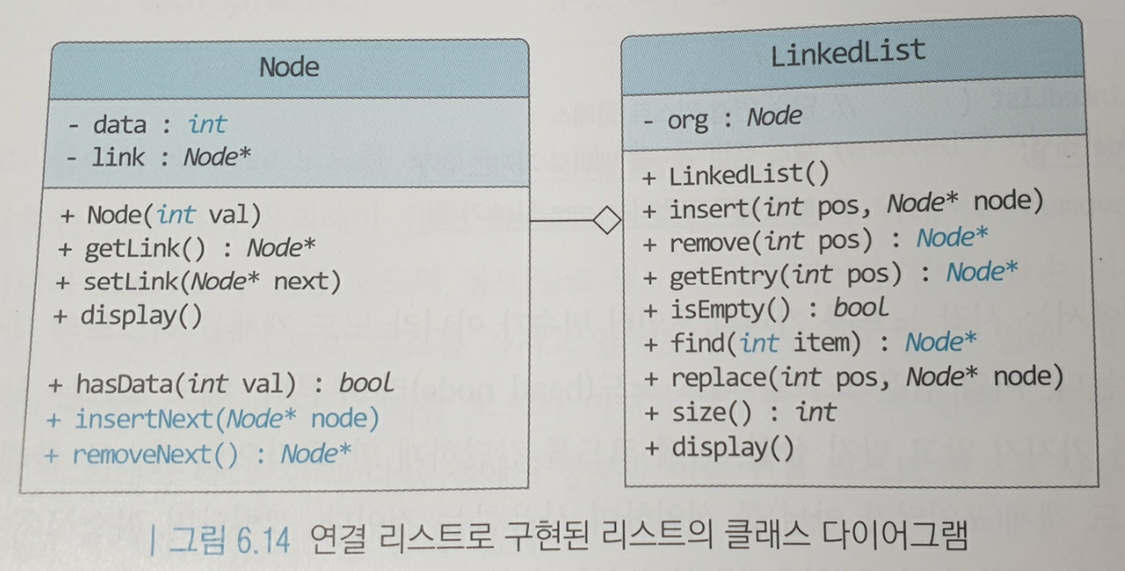
[Node class_header file]
#include <iostream>

class Node{
private:
    int data;   // node의 data 필드
    Node *link; // 다음 node를 가리키는 포인터변수
public:
    Node(int val) : data(val), link(nullptr) {}
    Node *getLink() { return link; }
    void setLink(Node *next) { link = next; }
    void display(){ printf(" <%2d>", data); }
    bool hasData(int val) { return data == val;}

    void insertNext(Node *node) {
        if (node != nullptr){
            node->link = link;  // 새로운 node의 link를 선행하는 node와 연결
            link = node;        // 후속 node의 link와 새 node를 연결
        }
    }
    Node *removeNext(){
        Node *removed = link;
        if (removed != nullptr)
            link = removed->link;   // 현재 node의 link를 다음다음 node의 data와 연결
        return removed;             // 삭제된 node주소를 반환해야 함. 그렇지 않으면 삭제된 node메모리가 해제되지 않고 위치를 잃어버림
    }
};
[Linked List class_header file]
[main_cpp file]
#include "LinkedList.h"

int main() {
    LinkedList list;
    list.insert(0, new Node(10));   // 리스트 맨 앞 10 삽입
    list.insert(0, new Node(20));   // 리스트 맨 앞 20 삽입
    list.insert(1, new Node(30));   // 리스트 1위치에 30 삽입
    list.insert(list.size(), new Node(40)); // 리스트 마지막에 40 삽입
    list.insert(2, new Node(50));
    list.display();

    list.remove(2);     // 리스트 2위치 삭제
    list.remove(0);     // 리스트 맨 앞 삭제

    list.replace(1, new Node(365)); // 리스트 1위치 값 365로 변경
    list.display();

    list.clear();       // 리스트 모든 항목 삭제
    list.display();
}
§ 이중 연결리스트 (Doubly Linked List)
이중 연결리스트에서 임의의 node를 가리키는 포인터를 p라하면 아래와 같은 관계가 항.상! 성립한다.
p == p->next->prev == p->prev->next
- 삽입과정 (insertion)
- 삭제과정 (deletion)
[구현]
[Node2 class_header file]
#include <iostream>

class Node2{
private:
    int data;       // node의 data 필드
    Node2 *prev;    // 선행 node를 가리키는 포인터
    Node2 *next;    // 후속 node를 가리키는 포인터
public:
    Node2(int val) : data(val), prev(nullptr), next(nullptr) {}
    Node2 *getPrev() { return prev; }
    Node2 *getNext() { return next; }

    void setPrev(Node2 *p) { prev = p; }
    void setNext(Node2 *n) { next = n; }
    void display() { printf(" <%2d>", data); }
    bool hasData(int val) { return data == val; }

    void insertNext (Node2 *node) {
        if (node != nullptr){
            // 삽입 node의 prev가 삽입node의 prev node의 data를 가리킴
            node->prev = this;
            // 삽입 node의 next가 삽입node의 next node의 data를 가리킴
            node->next = next;

            // 삽입 node의 next node의 prev link가 삽입node의 data를 가리킴
            if (next != nullptr)
                next->prev = node;
            // 삽입 node의 prev node의 next link가 삽입node의 data를 가리킴
            next = node;
        }

    }

    Node2 *remove() {
        if (prev != nullptr)
            return prev->next = next;   // 현재 node기준 선행 node의 link가 후속 node의 data를 가리킴
        if (next != nullptr)
            return next->prev = prev;   // 현재 node기준 후속 node의 link가 선행 node의 data를 가리킴
    }

};
[DBLinkedList class_header file]
[main_cpp file]
#include "DBLinkedList.h"

int main() {
    DBLinkedList list;
    list.insert(0, new Node(10));   // 리스트 맨 앞 10 삽입
    list.insert(0, new Node(20));   // 리스트 맨 앞 20 삽입
    list.insert(1, new Node(30));   // 리스트 1위치에 30 삽입
    list.insert(list.size(), new Node(40)); // 리스트 마지막에 40 삽입
    list.insert(2, new Node(50));
    list.display();

    list.remove(2);     // 리스트 2위치 삭제
    list.remove(0);     // 리스트 맨 앞 삭제

    list.replace(1, new Node(365)); // 리스트 1위치 값 365로 변경
    list.display();

    list.clear();       // 리스트 모든 항목 삭제
    list.display();
}
※ List Container (STL)
1. 관련 함수
§ iterator
begin(): beginning iterator 반환
end(): end iterator 반환

*iterator: iterator가 가리키는 원소에 접근
front(): 첫번째 원소 반환
back(): 마지막 원소 반환

§ 삽입 (insertion)
push_front(element): 리스트 맨 앞에 원소 추가
push_back(element): 리스트 맨 뒤에 원소 추가
insert(iterator, element): iterator가 가리키는 부분의 앞에 원소 추가

§ 삭제 (deletion)
pop_front(): 리스트 맨 앞의 원소 삭제
pop_back(): 리스트 맨 뒤의 원소 삭제
erase(iterator): iterator가 가리키는 부분의 원소 삭제

§ etc.
empty(): 리스트가 비어있는지 여부
size(): 리스트 사이즈 반환
2. 예시
#include <iostream>
#include <list>

using namespace std;

int main()
{
    // 리스트 생성
    list<int> a;

    // 원소 추가
    a.push_back(22);
    a.push_back(33);
    a.push_front(11);
    a.push_back(44);
    a.push_back(55);

    // 반복자 생성
    list<int>::iterator iter = a.begin();

    // 리스트 출력
    for(iter=a.begin(); iter!=a.end(); iter++)
    {
        cout << *iter << endl; // 원본 리스트: 11 22 33 44 55
    }

    cout << "" << endl;
    cout << "" << endl;

    // 원소 삭제
    a.pop_front();
    a.pop_back();

    for(iter=a.begin(); iter!=a.end(); iter++)
    {
        cout << *iter << endl; // 원소 삭제후 리스트: 22 33 44
    }

    cout << "" << endl;

    // 리스트 사이즈 출력
    cout << a.size() << endl; // 3 출력( 22, 33, 44 이므로)

    // 리스트가 비어있는가
    cout << a.empty() << endl; // 비어있지 않으므로 0 반환

    // 리스트 첫번째 원소 출력
    cout << a.front() << endl; // 22

    // 리스트 마지막 원소 출력
    cout << a.back() << endl; // 44

    cout << "" << endl;

    // 반복자 2번째 위치로 이동
    iter++; // 반복자가 두번째 원소(33)를 가리킴
    iter++; // 반복자가 세번째 원소(44)를 가리킴
    a.insert(iter, 55555);
    for(iter=a.begin(); iter!=a.end(); iter++)
    {
        cout << *iter << endl; //세번째 원소(44) 전에 추가하는 것(22,55555,33,44)
    }
}
객체의 변화를 관찰하는 observer들의 목록을 객체에 등록, 변화가 있을 때 함수를 이용해 관찰대상자가 직접 observer에게 통지해 그 객체에 의존성을 가진 다른 객체가자동으로 업데이트 하는 방식
[구조 예시]
● Generator: 관찰 대상자로 현재 관찰 대상자에 붙어있는 Observer들을 관리할뿐만 아니라 현재 관찰 대상자의 상태 정보를 얻기 위한 함수를 제공
           상태 변화시 등록되어 있는 모든 관찰자들에게 상태 변화를 통지해주는 함수를 제공합니다.

● StringGenerator: Generator를 상속받는 실제 상태 정보를 가지고 있는 객체.
                  상태 변화가 발생하면 상태 변화를 통지해주는 함수를 호출.

● Observer: 관찰자들이 가져야 할 공통인터페이스를 정의.

● StringObserver: 관찰 대상자의 상태 정보를 가져와 자신의 상태와 동기화.
                 이 객체는 관찰 대상자의 string형을 모니터에 출력해주는 객체입니다.

● StringCountObsever: 마찬가지로 관찰 대상자의 상태 정보를 가져와 자신의 상태와 동기화 합니다.
                      이 객체는 관찰 대상자인 string형 문자열의 개수를 화면에 출력하는 객체
#include <iostream>
#include <list>
#include <string>
using namespace std;

class IObserver {
public:
    virtual void Update(const string &message_from_subject) = 0;
    virtual ~IObserver(){ };
};

class ISubject {
public:
    virtual void Attach(IObserver *observer) = 0;
    virtual void Detach(IObserver *observer) = 0;
    virtual void Notify() = 0;
    virtual ~ISubject(){};
};

/* Subject는 일부 중요한 state를 소유, state가 변경되면 observer에게 알림*/
class Subject : public ISubject {
public:
    /* subscription 관리 함수 */
    void Attach(IObserver *observer) override { list_observer_.push_back(observer); }
    void Detach(IObserver *observer) override { list_observer_.remove(observer); }
    void Notify() override {
        list<IObserver *>::iterator iterator = list_observer_.begin();
        HowManyObserver();
        while (iterator != list_observer_.end()) {
            (*iterator)->Update(message_);
            ++iterator;
        }
    }
    void CreateMessage(string message = "Empty") {
        this->message_ = message;
        Notify();
    }

    void HowManyObserver() { cout << "There are " << list_observer_.size() << " observers in the list" << endl; }

    /*
     * 일반적으로 subscription logic은 Subject가 실제로 수행할 수 있는 작업의 일부이다.
     * Subject는 일반적으로 중요한 일이 발생할 때마다 통지 방법을 작동시키는 중요한 business logic를 갖고 있다.
     */
    void SomeBusinessLogic() {
        this->message_ = "change message message";
        Notify();
        cout << "I'm about to do some thing important\n";
    }

    virtual ~Subject() { cout << "Goodbye, I was the Subject" << endl; }

private:
    list<IObserver *> list_observer_;
    string message_;
};

class Observer : public IObserver {
public:
    Observer(Subject &subject) : subject_(subject) {
        this->subject_.Attach(this); // this는 observer
        cout << "Hi, I'm the Observer \"" << ++Observer::static_number_ << "\"" << endl;
        this->number_ = Observer::static_number_;
    }
    virtual ~Observer() {
        cout << "Goodbye, I was the Observer \"" << this->number_ << "\"" << endl;
    }

    void Update(const string &message_from_subject) override {
        message_from_subject_ = message_from_subject;
        PrintInfo();
    }
    void RemoveMeFromTheList() {
        subject_.Detach(this); // this는 observer
        cout << "Observer \"" << number_ << "\" removed from the list" << endl;
    }
    void PrintInfo() {
        cout << "Observer \"" << this->number_ << "\": a new message is available --> " << this->message_from_subject_ << endl;
    }

private:
    std::string message_from_subject_;
    Subject &subject_;
    static int static_number_;
    int number_;
};

int Observer::static_number_ = 0;   // static멤버변수 초기화 방법

void ClientCode() {
    Subject *subject = new Subject;
    Observer *observer1 = new Observer(*subject);
    Observer *observer2 = new Observer(*subject);
    Observer *observer3 = new Observer(*subject);
    Observer *observer4;
    Observer *observer5;

    subject->CreateMessage("Hello World! :D");
    observer3->RemoveMeFromTheList();

    subject->CreateMessage("The weather is hot today! :p");
    observer4 = new Observer(*subject);

    observer2->RemoveMeFromTheList();
    observer5 = new Observer(*subject);

    subject->CreateMessage("My new car is great! ;)");
    observer5->RemoveMeFromTheList();

    observer4->RemoveMeFromTheList();
    observer1->RemoveMeFromTheList();

    delete observer5;
    delete observer4;
    delete observer3;
    delete observer2;
    delete observer1;
    delete subject;
}

int main() {
    ClientCode();
}
※ Adapter Pattern
변환기처럼 서로 다른 두 인터페이스 사이 통신을 가능하게 해주는 디자인 패턴이다.프로그램에서 한 클래스의 인터페이스를 클라이언트로 사용하고자 하는 인터페이스로 변환 시 사용
또한 어댑터 패턴은 다중상속을 사용해 구현할 수도 있다.
[구조 예시]
#include <iostream>
#include <algorithm>
#include <string>
using namespace std;

/* Target: client code에서 사용되는 domain-specific interface를 정의한다. */
class Target {
public:
    virtual std::string Request() const { return "Target: The default target's behavior."; }
    virtual ~Target() = default;
};

/* Adaptee(기존객체)는 유용한 동작이 포함되어 있지만 interface가 기존client code와 호환되지 않는다.
 * 따라서 client code가 Adaptee를 사용하려면 적응할 필요가 있다.
 */
class Adaptee {
public:
    string SpecificRequest() const { return ".eetpadA eht fo roivaheb laicepS"; }
};

/* Adapter는 Adaptee의 interface가 Target's interface와 호환되게 한다. */
class Adapter : public Target {
private:
    Adaptee *adaptee_;
public:
    Adapter() { }
    Adapter(Adaptee *adaptee) : adaptee_(adaptee) {}

    string Request() const override {
        string to_reverse = this->adaptee_->SpecificRequest();
        reverse(to_reverse.begin(), to_reverse.end());
        return "Adapter: (TRANSLATED) " + to_reverse;
    }
};

/* client code는 Target interface를 따르는 모든 클래스를 지원한다. */
void ClientCode(const Target *target) { cout << target->Request(); }

int main() {
    cout << "Client: I can work just fine with the Target objects:\n";

    Target *target = new Target;
    ClientCode(target);
    cout << endl << endl;

    Adaptee *adaptee = new Adaptee;
    cout << "Client: The Adaptee class has a weird interface. See, I don't understand it: " << endl;
    cout << "Adaptee: " << adaptee->SpecificRequest();
    cout << endl << endl;
    cout << "Client: But I can work with it via the Adapter: " << endl;

    Adapter *adapter = new Adapter;
    ClientCode(adapter);
    cout << endl;

    delete target;
    delete adaptee;
    delete adapter;
}
[다중상속으로 구현한 코드]
#include <iostream>
#include <algorithm>
#include <string>
using namespace std;

class Target {
public:
    virtual string Request() const { return "Target: The default target's behavior."; }
    virtual ~Target() = default;
};

class Adaptee {
public:
    string SpecificRequest() const { return ".eetpadA eht fo roivaheb laicepS"; }
};

class Adapter : public Target, public Adaptee {
public:
    Adapter() { }
    string Request() const override {
        string to_reverse = SpecificRequest();
        reverse(to_reverse.begin(), to_reverse.end());
        return "Adapter: (TRANSLATED) " + to_reverse;
    }
};

void ClientCode(const Target *target) { cout << target->Request(); }

int main() {
    cout << "Client: I can work just fine with the Target objects: " << endl;

    Target *target = new Target;
    ClientCode(target);
    cout << endl << endl;

    Adaptee *adaptee = new Adaptee;
    cout << "Client: The Adaptee class has a weird interface. See, I don't understand it: " << endl;
    cout << "Adaptee: " << adaptee->SpecificRequest();
    cout << endl << endl;
    cout << "Client: But I can work with it via the Adapter: " << endl;

    Adapter *adapter = new Adapter;
    ClientCode(adapter);
    cout << endl;

    delete target;
    delete adaptee;
    delete adapter;
}
[Buschmann, et al. 1996]_ 최고의 캡슐화의 한 방법으로 매우 효율적으로 프로그래머들이 문제를 해결할 수 있을 것이다.
안정성, 확장성 등에도 효율적이며 패턴이 반복되는 설계문제를 해결하도록 하며 대표적으로 다음과 같은 예시들이 있다.
이렇게 많은 디자인 패턴 종류에서 유명한 3가지인 싱글톤, 팩토리 메소드, 브릿지 패턴을 이번에 정리할 것이다.
※ Singleton
하나의 (전역)인스턴스만 생성하여 사용하는 디자인 패턴.
인스턴스가 필요할 때, 기존의 인스턴스를 활용하는 것.
한번의 new를 통한 객체생성으로 메모리 낭비를 방지가능!
딱 하나의 독자적인 클래스생성을 진행하며 그 클래스의 객체가 복사되면 안된다.
[구조]
class Singleton {
private:
    // 생성자는 private으로 막는다.
    // 따라서 외부에서 new를 이용한 객체생성이 불가능하다.
    Singleton();

    Singleton(const Singleton& ref) { }

    Singleton& operator=(const Singleton& ref) { }

    ~Singleton() { }

    // 객체 하나를 담을 수 있는 포인터 변수를 선언
    // 이때, static으로 선언해서 단 하나만 존재할 수 있게 한다.
    static Singleton *single;

public:
    // single을 가져오거나 해제하는 멤버함수 선언
    // static변수에 접근하고 외부에서 쓸 수 있어야 해서 publc으로 지정
    static Singleton *getInstance();
    static void DestroySingle();
};

Singleton *Singleton::single = nullptr;     // static멤버변수이기에 클래스 외부에서 초기화
Singleton::Singleton() { }

Singleton *Singleton::getInstance() {
    if (!single)        // single이 nullptr일 때,
        single = new Singleton;   // 새로 생성해 객체를 초기화
    return single;      // 앞으로 호출될 때마다 이미 생성된 객체를 return
}

void Singleton::DestroySingle() {   // getInstance() 함수와 유사
    if (!single)
        return;
    delete single;
    single = nullptr;
}
※ Factory Method
객체생성이 복잡하거나 어렵다면, 이를 대행하는 함수를 두는 설계방식.객체를 생성하지만생성자를 호출하지 않고 대행함수를 통해 간접적으로 객체를 생성한다.
팩토리 메서드 패턴은 복잡도가 낮고 높은 수준의 유연성을 제공해야할 때, 매우 유용하다.
즉, 생성자 기능을 대신하는 메소드를 별도로 정의하는 방식이다.
[구조 예시]
#include <iostream>
#include <string>
using namespace std;


class Product {  // 인터페이스(interface) 선언
public:
    virtual string Operation() const = 0;
    virtual ~Product() { }
};

class ConcreteProduct1 : public Product {   // 인터페이스 상속
public:
    string Operation() const override {
        return "{Result of the ConcreteProduct1}";
    }
};
class ConcreteProduct2 : public Product {   // 인터페이스 상속
public:
    string Operation() const override {
        return "{Result of the ConcreteProduct2}";
    }
};

/* Product 인터페이스의 객체를 return하는 factory method를 선언하는 Creator 클래스
 * Creator클래스의 하위 클래스는 factory method를 상속받음 */

class Creator {     // 인터페이스 클래스는 선언만 진행 (구현X)
public:
    virtual Product *FactoryMethod() const = 0;
    virtual ~Creator(){};

    /* factory method에서 반환된 product 객체에 의존한다. */
    string SomeOperation() const {

        // Product객체생성을 위한 factory method 호출.
        Product *product = this->FactoryMethod();

        string result = "Creator: 동일한 creator의 코드가 " + product->Operation() + "과 작동중";
        delete product;
        return result;
    }
};

/* product type변환을 위해 factory method를 재정의하는  Concrete Creator 클래스들 */
class ConcreteCreator1 : public Creator {
public:
    Product *FactoryMethod() const override {
        return new ConcreteProduct1();
    }
};
class ConcreteCreator2 : public Creator {
public:
    Product *FactoryMethod() const override {
        return new ConcreteProduct2();
    }
};

/* ClientCode 함수는 ConcreteCreator 객체와 함께 작동
 * 기본 인터페이스로 어떤 creator 하위클래스에도 전달 가능 */
void ClientCode(const Creator& creator) {
    cout << "Client: I'm not aware of the creator's class, but it still works.\n" << creator.SomeOperation() << endl;
}

int main() {
    cout << "App: Launched with the ConcreteCreator1.\n";
    Creator *creator = new ConcreteCreator1();
    ClientCode(*creator);

    cout << endl;

    cout << "App: Launched with the ConcreteCreator2.\n";
    Creator *creator2 = new ConcreteCreator2();
    ClientCode(*creator2);

    delete creator;
    delete creator2;
    return 0;
}
※ Bridge pattern
구현부에서 추상층을 분리, 각각 독립적으로 변형과 확장이 가능하게 하는 패턴 java에선 super키워드도 사용
따라서 두 계층 모두 추상화된 상위 타입을 갖고 의존성은 상위 타입간에만 이뤄진다.
인터페이스와 구현방식이 완전 결합되는 것을 피할 때 사용
하위 클래스 구조가 서로 다른 형태이길 원할 때 사용
과거 C++개발자들은 컴파일 단축을 위해 Pimpl이라는 독특한 관례를 사용했다. (Pointer to Implement)
Pimpl은 말그대로 구현부를 포인터로 참조하는 것이다.
장점 1: 클래스의 private, protected멤버가 헤더로 노출되기에 불필요한 노출을 막을 수 있다.
장점 2: 숨겨진 구현클래스에 대한 수정이 바이너리 호환성에 영향X
장점 3: 헤더파일에 구현에 필요한 다른 헤더를 포함하지 않아도 된다.
컴포넌트 간 다양한 조합이 가능할 때 효과적이며 실제 구현을 모두 인터페이스에 위임한다.
[구조 예시]
Abstraction:기능 계층의 최상위 클래스.
구현부분에 해당하는 클래스를 객체를 이용해 구현부분의 함수를 호출
Refind Abstraction:기능 계층에서 새로운 부분을 확장한 클래스
Implementation:추상클래스의 기능을 구현하기 위한 인터페이스 정의
Concrete Implementor:실제 기능을 구현하는 것
#include <iostream>
#include <string>
using namespace std;

/******************************<인터페이스 구현>******************************/
class Implementation {
public:
    virtual string OperationImplementation() const = 0;     // 순수가상함수
    virtual ~Implementation() { }
};
class ConcreteImplementationA : public Implementation {
public:
    string OperationImplementation() const override  {
        return "ConcreteImplementationA: Here's the result on the platform A.\n";
    }
};
class ConcreteImplementationB : public Implementation {
public:
    string OperationImplementation() const override {
        return "ConcreteImplementationB: Here's the result on the platform B.\n";
    }
};

/******************************<추상클래스 구현>******************************/
class Abstraction {
protected:
    // 인터페이스 클래스에 대한 포인터참조로 브릿지 패턴을 잘 나타내고 있음을 알 수 있다.
    Implementation *implementation_;
public:
    Abstraction(Implementation *implementation) : implementation_(implementation) { }
    virtual string Operation() const {
        return "Abstraction: Base operation with:\n" + this->implementation_->OperationImplementation();
    }
    virtual ~Abstraction() { }
};
class ExtendedAbstraction : public Abstraction {
public:
    ExtendedAbstraction(Implementation* implementation) : Abstraction(implementation) { }
    string Operation() const override {
        return "ExtendedAbstraction: Extended operation with:\n" + this->implementation_->OperationImplementation();
    }
};

void ClientCode(const Abstraction& abstraction) {
    cout << abstraction.Operation();
}

int main() {
    Implementation *implementation = new ConcreteImplementationA;
    Abstraction *abstraction = new Abstraction(implementation);
    ClientCode(*abstraction);

    cout << endl;

    delete implementation;
    delete abstraction;

    implementation = new ConcreteImplementationB;
    abstraction = new ExtendedAbstraction(implementation);
    ClientCode(*abstraction);

    delete implementation;
    delete abstraction;
}